
One of the first things you will need to know is how to login to the backend of your website. eMerchantClub makes logging into your website very easy to do.
Start with your domain name:
The easiest way for you to start is by entering your domain name (store name) into your URL.
Here is an example: 
Don’t hit enter or visit your site just yet! Because the next thing you will do is add some text to the tail of your URL. The specific text is this /emcadmin
So, your entire URL would look like this: mywholesalesuperstore.com/emcadmin

Hit enter and if you have done this correctly you will see this login screen.
Your Username & Password were emailed to you. Enter those into the fields and click Sign In.
If you forgot your Username and Password please call tech support and we can reset it for you!
Setting up your business PayPal account is imperative for your eMerchantClub website. To process orders you will need a business PayPal connected to your website. In this documentation we will discuss setting up the business PayPal account.
Setting up PayPal business from scratch
First, go to PayPal.com to begin your business PayPal set up. For this example we will imagine you have no existing PayPal account already and need to create one.
If you already have a PayPal account you can skip this process and go to Upgrade To Business PayPal Account.
Click PayPal for Business to start creating your PayPal business account. After navigating to the page click ‘Sign up for Free’ to start the creation of your account.
You can also simply click ‘Sign Up’ if you can’t locate the ‘PayPal for Business’ link. After clicking sign up which should normally be located in the top right corner you should see the options for Personal or Business account:
The first thing you will be asked to do when signing up for this business account is for your email. Make sure to use a email that is active and that you already have access to. Do not make up an email for this step. A good idea is to use the same email that you used when signing up for eMerchantClub.
After entering your email. Set your password. Make sure you write this password down or save it on your phone.
Next, PayPal will ask you about your business. Enter in all of your business information and check the box at the bottom to agree to PayPal’s terms and conditions. Your final step is to click Agree and Create Account. 
It’s possible that PayPal may ask you to verify your email. If that is the case, check the email inbox that you provided PayPal for your business account and simply click the verification like.
Please remember that simply creating this PayPal Business Account does NOT mean you are done and can accept payments on your site. You must complete the second step of PayPal which is connecting your PayPal business account to your website.
Click HERE to learn how to connect your PayPal business account
Upgrading from personal PayPal account to Business PayPal account
If you already have a personal PayPal account you can upgrade that account to a business PayPal account for free.
Follow these steps to upgrade to a business PayPal:
Step 1 is to click on settings:
Step 2 is to click on Upgrade to business account:
Step 3 enter business information and accept terms & Agree and Update Account:
Now your account will be upgraded from personal to business!
We will now cover how to connect your business PayPal account to your Magento website. This process is very simple but you need to follow the steps very closely to execute this correctly.
Login to your site manager:
The first thing you need to do is login to your website manager (think of this as the backend of your website)
Please remember to login to your website simple enter in your URL followed by /emcadmin to get to login screen. From there you will enter your login credentials that were emailed to you.
For example:
URL = google.com
Site manager URL = google.com/emcadmin
Remember to enter this information in the URL bar and NOT Google.
This is what your login area should look like:

After logging into your site manager be sure to login to your business PayPal account so you are prepared. You will need to jump from your site manager and PayPal account to complete this set up.
The set up
Now, we will cover all of the steps to set up the connection between your PayPal account and website. Please follow the steps and screen shots exactly remembering to copy and paste information when needed.
From your side panel navigate to Stores > Configuration
After selecting Configuration… navigate down to Sales (click for drop down) then select Payment Method
Now, you will see PayPal Express Checkout option. You need to click Configure
Enter in your PayPal email for ‘Email associated with PayPal merchant account’ field:
Now click Get Credentials From PayPal button and enter in your information. Making sure to enter your PayPal email and password when prompted.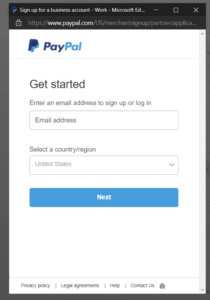
If you enter these credentials correctly you will see a success message followed by a button that says Continue To PayPal Set Up
Click the button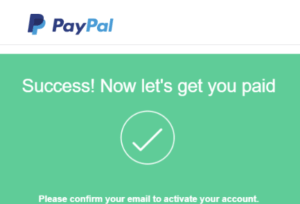
After clicking Continue to PayPal Set Up you will be redirected to your PayPal dashboard home page. Next, you will need to go into your PayPal settings and retrieve some information for your Magento website.
This is your navigation: Hover over your name in top right > Click account settings from dropdown > then click Update in API Access section
Next, scroll all the way down to NVP/SOAP API integration (Classic) section and click > manager API credentials
Now the important Copying & Pasting begins. Let’s copy and paste to ensure we don’t make mistakes entering credentials.
First, click Show next to API Username.
Your PayPal API Username will now be shown. Do not share this with anyone. Copy and Paste this information in your site manager where you were at before (Express checkout section)… in the API Username field.
Repeat this action for API Password and API Signature.
Next, make sure Enable this solution & Enable In-Context Checkout Experience is set to YES.
Your last step is to get your Merchant Account ID from PayPal.
Go back to Account Settings > Click Business Information
You will see your PayPal Merchant ID. Copy and Paste that ID into Merchant Account ID section in Magento.

Now simply click the big orange Save Config button in top right corner to save and apply your changes. Your PayPal Business account should now be connected to your website!
